LabPilot User Guide
1. Welcome to LabPilot
LabPilot is a mobile-first platform that connects laboratories (who need specimens collected) with service providers (the mobile phlebotomy teams who collect them) and patients (who provide the samples). Orders, scheduling, dispatch, collection, label printing, results, and reporting all live in one app. The screens you see, the buttons you tap, and the data you can access are tailored automatically to your role and your active company.
How to use this guide
Find your role below and jump to the sections that match your day-to-day work. Every other section in the guide explains a specific feature in detail — flip to those when you need to learn something new.
| If you are a... | Start with |
|---|---|
| Field Worker / Phlebotomist | Section 10 (Field Worker Workflow), then Section 11 (Map, Routes, Location) and Section 12 (Specimens and Label Printing). |
| Manager / Dispatcher | Section 6 (Dashboard), Section 7 (Orders), Section 9 (Assignment), and Section 17 (Users, Teams, Invitations). |
| Lab Admin | Section 7 (Orders), Section 13 (Test Catalog), Section 15 (Integrations), and Section 24 (Contracts). |
| Sales | Section 21 (Sales). |
| Referring Physician | Section 22 (Physician Portal). |
| Pool Phlebotomist (no company yet) | Section 23 (Phlebotomist Pool). |
| Patient or guest user | Section 8 (Scheduling), specifically "Patient/Guest Experience". |
Need help?
Email support@labpilotapp.com for anything this guide does not cover. If you find incorrect information here, let us know — we keep it up to date.
2. What LabPilot Is
LabPilot is a multi-tenant laboratory operations platform. One application supports:
- Laboratories that own orders and manage the test catalog.
- Service providers that execute collections for laboratories.
- Field workers who collect specimens and complete mobile workflows.
- Sales teams that manage commercial accounts without clinical or PHI access.
- Referring physicians who create and track physician-scoped orders.
- Guests and patients who use public scheduling and catalog flows without a full staff account.
The backend runs on AWS Amplify Gen 2 with Cognito, API Gateway HTTP API v2, Lambda, DynamoDB, S3, real-time notifications, and partner integrations. The frontend is a Flutter app with Riverpod state management, Material UI, Google Maps, offline queues, and platform-specific mobile and web behavior.
3. Core Concepts
You will see these terms throughout the app and this guide.
Companies and tenants
Every operational record belongs to a company context. The main company types are:
- LAB — owns orders, creates orders, manages the test catalog and contracts, and assigns work.
- SERVICE_PROVIDER — executes work assigned by labs, dispatches field workers, and handles route and collection workflows.
Orders are owned by a lab and may be executed by the owning lab or by an assigned service provider. The key ownership fields on an order are labCompanyId (the owning lab) and assignedProviderCompanyId (the provider executing it, when outsourced).
Users and memberships
A signed-in identity can have memberships in one or more companies. Each membership has its own role and capabilities. When you sign in, LabPilot picks an active company, loads the capabilities for that company, and routes you to the right shell.
If you belong to more than one company, the app shows a company selector so you can choose which one to work in.
Roles
The staff roles you may see are:
| Role | Purpose |
|---|---|
Admin | Company administration |
PhlebManager | Clinical operations manager |
Phleb | Collection specialist |
HomeDrawManager | Mobile operations manager |
HomeDraw | Mobile collection specialist |
LogisticManager | Logistics operations manager |
Logistic | Courier/logistics specialist |
SalesManager | Commercial team manager |
Sales | Commercial representative |
Physician | Referring physician portal user |
Capabilities
The app does not decide what you can see purely from your role name. After sign-in it fetches a capabilities object from the backend that lists exactly what your account is allowed to do. Capabilities are grouped roughly into:
- Orders — view summary, view PHI, view all orders, view assigned-only, create, edit.
- Assignment — assign orders, assign to provider, configure rules, access tools, claim from pool, accept or reject assignments.
- Team — view team, invite users, edit users, disable users, manage sales team.
- Settings — manage company settings, manage integrations, view imports, manage contracts.
- OCR — manage OCR documents, scan orders.
- Audit — view audit logs.
- Reports — view reports, view commercial reports, export reports.
- Map — view map, view team locations.
- PHI — view PHI, view patient details.
- Sales — view sales accounts only.
- Physician — create physician orders, view own results, manage patient panel.
If a feature mentioned in this guide is missing from your app, your capabilities probably do not grant it. See Section 28 (Troubleshooting) for how to check.
Access states
After sign-in the app routes you into one of the following access states:
- onboarding — your account exists but setup is incomplete.
- poolOnly — you can maintain a pool profile but do not have full company access.
- pendingApproval — your access is waiting for an admin to approve it.
- disabled — your account or membership has been disabled.
- fullAccess — you have an active membership and capabilities and can use the full app.
PHI and sales restrictions
Sales roles are intentionally separated from clinical workflows. Sales users do not see patient-identifying order details, clinical order lists, the live map, team locations, assignment tools, or operational settings. The Sales shell shows commercial dashboards, accounts, physicians, activities, settings, and support — and nothing else.
4. App Entry and Login
First launch
When you launch LabPilot for the first time, it initializes its services and storage, then checks four things in order:
- Whether you have a valid Cognito session from a previous sign-in.
- Whether your profile and memberships can load from the backend.
- Whether you need onboarding, are pending approval, are pool-only, are disabled, or have full access.
- Which active company and capabilities apply.
You do not need to do anything during this check — if you are signed in, you land on your shell. If not, you see the sign-in screen.
How to sign in
- On the entry screen, tap Sign In.
- Enter the email address tied to your work account and your password.
- Tap Sign In to continue.
Depending on how your organization configured Cognito, you may be asked to:
- Set a new password the first time you sign in (the new-password challenge).
- Set up a TOTP authenticator app (the TOTP setup flow).
- Enter a TOTP code during each sign-in.
- Reset your password through Forgot Password if you cannot remember it.
Tip: If you get stuck on a challenge screen, the buttons at the bottom always offer a way back to Sign In so you can try again.
How to sign up
Self-service sign-up creates a Cognito identity and a profile, but it does not automatically place you inside a company. To use the full app you need either:
- An invitation from an organization admin, or
- An approval of your access request by an admin.
To sign up:
- From the sign-in screen, tap Create Account (or Sign Up).
- Enter your email, choose a password, and confirm the email with the code that arrives in your inbox.
- After confirmation, ask your organization admin to invite or approve you. Until then, the app may show you a pool-only profile screen, an onboarding prompt, or a "waiting for approval" message — that is normal.
Note: In production-style deployments, you should generally expect to be invited by an admin rather than to self-sign-up.
How admin invitations work
When an admin invites you, the backend creates or fetches your Cognito user, assigns you to a role group, creates your profile, and creates a company membership in one operation. You receive an email invitation; tap the link, set a password if prompted, and the app will land you in the right shell.
How to choose a company
If your account is a member of more than one company:
- After sign-in, the app shows a company selector.
- Tap the company you want to work in.
Your choice determines the visible shell, your active role, your capabilities, the data partition you see, and the scope of orders, team, settings, and reporting. You can switch later from Settings (see Section 18).
How to sign out
- Open Settings from your shell.
- Scroll to the bottom and tap Sign Out.
Signing out stops background services (such as live location), clears your session and capability state, and returns you to the entry screen.
How to delete your account
- Open Settings.
- Tap Delete Account near the bottom.
- Confirm the first warning, then type DELETE in the second confirmation to prove intent.
- Tap the final delete button.
The app calls the account deletion API and signs you out locally when the deletion succeeds. Deletion is permanent.
5. Navigation Shells
LabPilot loads a different shell (the bottom-tab layout you see) based on your role and active company. Each shell exposes a different set of tabs.
Manager Shell
Primary purpose: company-scoped operations for lab or service-provider managers.
| Tab | What you use it for |
|---|---|
| Dashboard | KPIs, quick actions, attention items, recent orders |
| Orders | Search, filter, create, view, bulk action, and manage orders |
| Map | Live order and team map |
| Team | Company user and team management |
| More | Reports, shifts, mileage, assignments, analytics, test catalog, contracts, OCR, integrations, pool, settings, audit logs |
The Manager shell adapts to your company type:
- LAB managers can create and edit orders, assign internally, assign to providers, configure assignment rules, and manage lab-owned orders.
- SERVICE_PROVIDER managers primarily manage assigned execution work, dispatch field workers, and view provider-scoped data.
Field Worker Shell
Primary purpose: mobile collection workflow.
| Tab | What you use it for |
|---|---|
| My Orders | Your assigned order list and execution actions |
| Schedule | Your upcoming assignments |
| Map | Your personal live map and route view |
| Shift | Start and end shifts, breaks, mileage, earnings |
| Profile | Profile, stats, sync, mileage, pool profile, help |
You will also see:
- An offline banner and a sync indicator when your network is unstable.
- A live location active banner when LabPilot is sharing your location during an active work session (see Section 11).
- An OCR scan action when your capabilities allow scanning requisitions.
- Profile quick actions for order history, schedule, mileage, pool profile, performance, and help.
Sales Shell
Primary purpose: commercial operations without clinical access.
| Tab | What you use it for |
|---|---|
| Dashboard | Commercial metrics and optional order summary counts |
| Accounts | Sales accounts |
| Physicians | Physician and customer records |
| Activities | Commercial activity history |
| More | Settings and Help & Support |
Sales users can log commercial activities from the Activities tab. They cannot access clinical orders, PHI, assignment tools, map tracking, or operational settings.
Physician Shell
Primary purpose: referring physician portal.
| Tab | What you use it for |
|---|---|
| Dashboard | Physician summary |
| Orders | Your physician-scoped order list |
| Results | Result notifications and result access |
| Patients | Your patient panel |
| Standing Orders | Recurring order templates |
As a physician you can:
- Create a new physician order when your account is allowed to create orders.
- Create a new standing order from the Standing Orders tab.
- See unread result count badges on the Results tab.
- Pull down to refresh physician orders, results, and dashboard data after creating an order.
Guest Shell
Primary purpose: unauthenticated public access.
| Tab | What you use it for |
|---|---|
| Home | Guest landing page and sign-in prompt |
| Schedule | Public appointment booking |
| Tests | Public test catalog |
Guest mode starts a limited session. The app warns you near expiration and prompts you to sign in or create an account when the session expires. Public scheduling links use the /s/{token} URL pattern and do not require a staff login.
Pool-Only Shell
Primary purpose: phlebotomists who do not yet have a full company membership but want to maintain a professional pool profile.
| Tab | What you use it for |
|---|---|
| My Profile | Create or edit your profile, upload a photo, manage documents, view engagement |
| Settings | Email, sign out, refresh to check for invitations |
As a pool-only user you can create a pool profile, upload profile documents and a photo, see which companies have vetted you, and pull to refresh to check whether you have been invited into a company. See Section 23 for the full pool workflow.
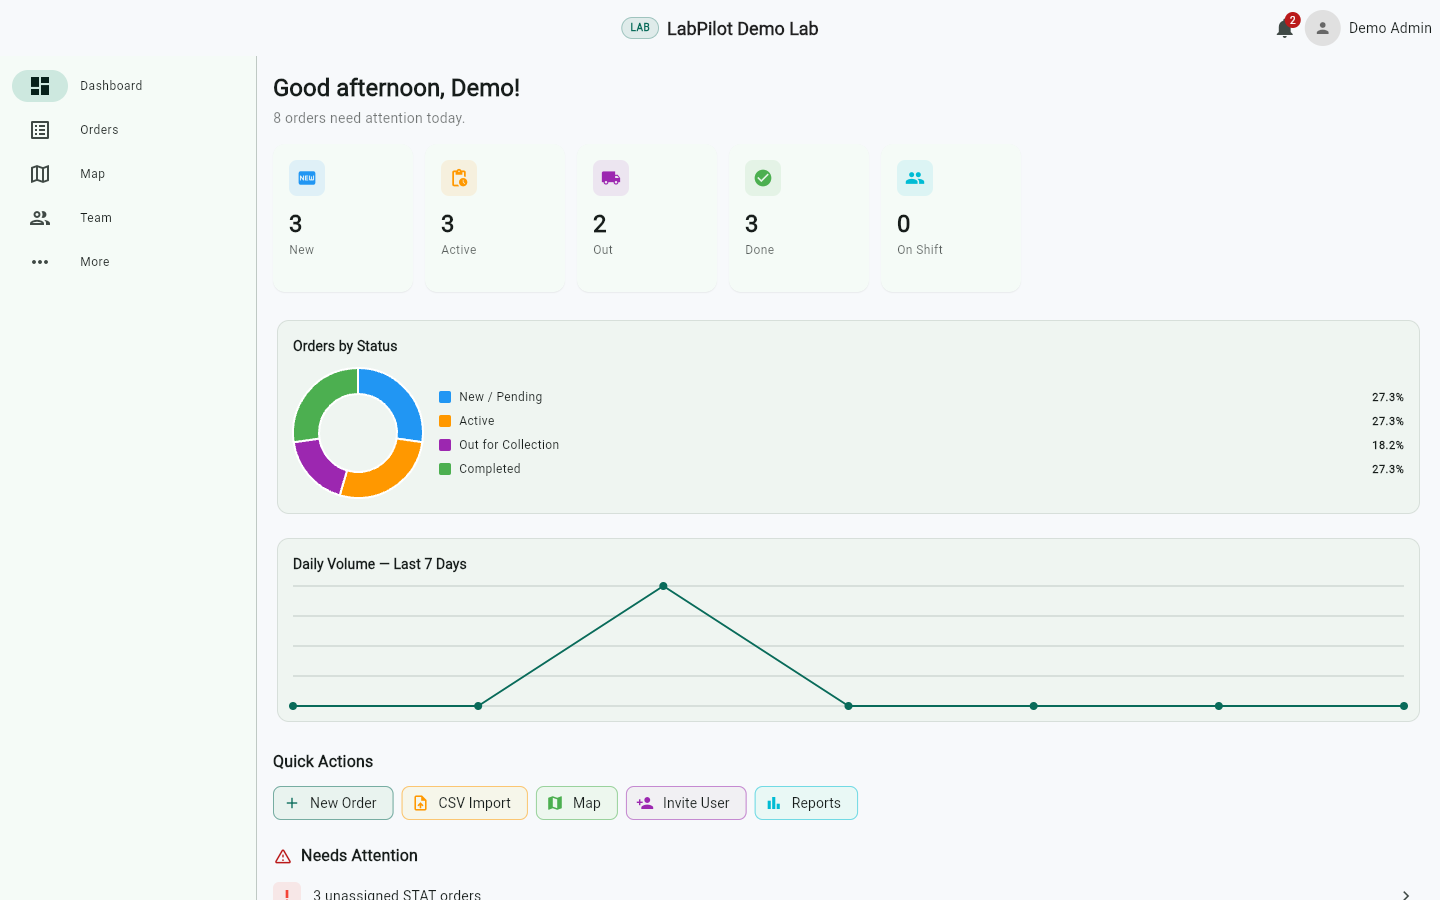
6. Dashboard
The Manager Dashboard is your operational command center. It is the first tab you see after sign-in if you are a manager.
What the Dashboard shows
- A greeting and a one-line day summary.
- KPI cards for new, active, out-for-collection, and completed-style buckets.
- An order status chart.
- Quick actions: new order, CSV import, map, invite user, reports.
- A Needs attention list for STAT orders, approvals, and shift exceptions.
- Recent orders with direct navigation to each order's detail screen.
- Pull-to-refresh and background polling while the tab is active.
How to use the Dashboard
- To jump straight to an order, tap any row in the Recent orders list.
- To filter the order list by a status, tap the matching KPI card — it applies that filter and switches you to the Orders tab.
- To handle an attention item, tap a row in the Needs attention list to open the order or exception that needs you.
- To refresh manually, pull down on the screen.
7. Orders
Orders are the central work object in LabPilot. Every order has a patient, one or more tests, a status, an owning lab, and (when assigned) a phlebotomist or provider doing the work.
Order fields
Each order carries:
- Identifiers: order ID, company ID, lab ID, accession number, source.
- Patient: name, date of birth, phone, email, gender.
- Address and location: address lines, city, state, ZIP, latitude, longitude.
- Scheduling: scheduled time, home draw flag, scheduling token, status, and window.
- Status: current workflow state.
- Results status: pending, partial, final, or critical.
- Tests: count, summaries, and test codes.
- Assignment: the assigned user ID.
- Priority: normal, high, or STAT/urgent.
- Physician: name, ID, and NPI.
- Diagnosis and insurance metadata.
- Delivery notes.
- Created and updated timestamps.
How to find an order
- Open the Orders tab.
- Use the search bar at the top to find by patient name, accession, or address.
- Use the quick status tabs to narrow the list — All, Pending, In Progress, or Completed.
- Tap the filter icon to open filter chips for finer control, then tap Apply.
- To save a filter combination for next time, open the overflow menu (⋮) and tap Save filter preset — give it a name in the dialog and tap Save. To load one, open the same menu and tap Filter presets, then pick a saved preset.
- Pull down to refresh, and scroll to load more — the list paginates automatically.
Tip: A small chip near the search bar shows how many filters are currently active. Tap it to clear them all at once.
If your capabilities do not allow viewing orders, the screen shows an access denied state with guidance.
Quick status tabs
The quick tabs group statuses as follows:
| Tab | Included statuses |
|---|---|
| All | No status filter |
| Pending | NEW_PENDING_SCHEDULING, PATIENT_LINK_SENT, PATIENT_SCHEDULED |
| In Progress | ASSIGNED_TO_PHLEB, PHLEB_ACCEPTED, EN_ROUTE_PHLEB, ARRIVED_AT_PATIENT, SPECIMEN_COLLECTED, PICKED_UP_BY_DRIVER, IN_TRANSIT_TO_LAB, DELIVERED_TO_LAB |
| Completed | COMPLETED |
Order statuses
| UI label | Backend value |
|---|---|
| New | NEW_PENDING_SCHEDULING |
| Link Sent | PATIENT_LINK_SENT |
| Scheduled | PATIENT_SCHEDULED |
| Assigned | ASSIGNED_TO_PHLEB |
| Accepted | PHLEB_ACCEPTED |
| En Route | EN_ROUTE_PHLEB |
| Arrived | ARRIVED_AT_PATIENT |
| Collected | SPECIMEN_COLLECTED |
| Picked Up | PICKED_UP_BY_DRIVER |
| In Transit | IN_TRANSIT_TO_LAB |
| Delivered | DELIVERED_TO_LAB |
| Completed | COMPLETED |
| Cancelled | CANCELLED |
How to create an order
- On the Orders tab, tap New Order (or the + button).
- The wizard opens with Step 1: Patient and Tests.
- Enter patient name, phone, email, date of birth, and gender.
- Tap the test picker and select at least one test from the catalog.
- Set the priority (normal, high, or STAT).
- Tap Next to go to Step 2: Address and Physician.
- Enter the patient address. Address autocomplete helps you pick a verified location.
- Choose a referring physician. In physician-scoped contexts, the session physician is selected automatically.
- Tap Next to go to Step 3: Scheduling and Notes.
- Pick the scheduled date and time.
- Toggle home draw on if the collection happens at the patient's address.
- Add notes for the field worker or dispatcher.
- Attach a photo from the camera or gallery if useful.
- If you are in a physician context, choose the preferred lab or provider.
- Tap Save to create the order.
Tip: To reuse common setups, open the wizard's overflow menu (⋮) and tap Save as template — give it a name and tap Save. Next time, open the menu and tap Load template to pre-fill the form from a saved template.
The app validates required fields and requires at least one selected test before it lets you submit.
Order sources
The backend supports many ways for orders to arrive:
- Manual app creation (the wizard above).
- CSV import (Section 16).
- SFTP import (Section 15).
- HL7 ORM messages.
- FHIR ServiceRequest or Bundle ingestion.
- OCR intake from a scanned requisition (Section 14).
- Direct API ingestion.
- Patient request and order-request flows.
- Physician order creation from the Physician shell.
Order detail
Tap any order from the list to open the Order Detail screen. It has five tabs:
| Tab | What you do there |
|---|---|
| Overview | Read the patient and order summary, see status and quick actions, view assignment, location, scheduling, physician, tests, and collection requirements |
| Timeline | Read the chronological status and event history |
| Results | View lab results and PDFs when available |
| Notes | View, add, and delete notes where your role allows |
| Files | View, upload, download, and delete attachments where your role allows |
The Overview tab also shows context and ownership badges, provider execution cards when an external provider is doing the work, patient visibility restrictions (when PHI is hidden), collection requirements, map and ETA data, and the Print Labels action when the order is in a printable state.
How to edit, cancel, or reassign an order
From the Overview tab, the action buttons available depend on the order status and your capabilities. You may see any of these:
- Edit — open the order in an edit screen and update its fields.
- Cancel — cancel the order. You are prompted to enter a reason; this becomes part of the timeline.
- Assign / Reassign — pick a different user or provider. See Section 9 for assignment flows.
- Claim — for available pool orders, claim the order for yourself.
- Accept — accept an assignment offered to you.
- Reject — reject an assignment with a reason.
- Transition — move the order forward to the next allowed status.
- Print Labels — print or reprint specimen labels (Section 12).
If an action does not appear, your role or the current status does not allow it.
How to add notes and attachments
To add a note:
- Open the order and switch to the Notes tab.
- Tap the + button or the Add Note action (also available from the Overview FAB).
- Type the note and tap Save. The note appears in the list with your name and a timestamp.
- To delete a note you authored, tap the trash icon next to it.
To upload an attachment:
- Open the order and switch to the Files tab.
- Tap Upload and choose a file from your device, the camera, or the gallery.
- The file uploads in the background and appears in the list when complete.
- To download or delete, use the icons next to each file.
How to perform bulk actions
- On the Orders tab, tap the Bulk actions icon in the toolbar (or long-press any order in the list to enter selection mode).
- Tap the checkbox on each order you want to act on, or tap Select All.
- The action bar at the bottom shows the actions available — for example Print Labels, Assign, Export, and status transitions.
- Tap the action you want and confirm in the dialog.
- To exit selection mode, tap Clear Selection (or the back arrow).
Timeline
The Timeline tab is read-only. It shows every status transition and event, with a timestamp and the actor who performed it. The backend stream processor and timeline routes keep this history complete and auditable.
8. Scheduling
Scheduling on staff-created orders
Orders created through the manager or physician wizard can include a scheduled time and a home-draw flag. Managers control company-wide scheduling defaults in Settings (see Section 18 — Company Settings).
The company-level scheduling settings include:
- Appointment and booking configuration.
- Auto-send scheduling requests quick setting.
- The default scheduling request method.
Public scheduling links
Each order can be given a public scheduling link to send to the patient by SMS or email. The patient picks a time without creating a staff account. The link uses the URL pattern /s/{token}.
Under the hood, the public scheduling API exposes:
- Get order info.
- Submit a schedule.
- Record a reply.
- Get availability.
- Get time slots.
- An SMS webhook for patient text responses.
Patient and guest experience
When a patient opens a scheduling link:
- The app loads the order's scheduling information.
- The patient browses available time slots.
- The patient submits a preferred slot, which is recorded against the order.
The guest scheduling UI handles loading, expired token, invalid token, slot unavailable, generic error, and success states. From the guest shell, patients can also browse the public test catalog and tap Sign In or Create Account if they want a full account.
9. Assignment
Assignment connects orders to internal users or to provider companies. Managers run assignment from More → Assignments.
The Assignment workspace
When you open More → Assignments, you see:
- An assignment mode toggle for switching between manual, rule-based, and auto-zip/claim-pool modes.
- A team workload section showing how many active orders each user has.
- A claim pool settings card when auto-zip mode is active.
- An assignment rules summary when rule-based mode is active.
- Quick actions for common assignment operations.
How managers assign orders manually
- Open the Orders tab and find the order you want to assign.
- Tap the order to open detail, then tap Assign (or Reassign).
- In the assign dialog, pick a user from the list. The list is sourced from your team and, where supported, your provider partners.
- Tap Assign to confirm. The order's status moves to Assigned and the chosen user is notified.
How to bulk-assign
- Open the Orders tab and enter selection mode (long-press or tap Bulk Actions).
- Select the orders to assign.
- Tap Bulk Assign in the action bar.
- Pick the target user or provider and confirm. Each order is assigned and a single confirmation summarizes the result.
How to set up rule-based assignment
In rule-based mode, the system applies your rules first and falls back to manual or pool when no rule matches.
- From More → Assignments, switch the mode to Rule-based.
- Tap Manage Rules to open the rules list.
- Tap Add Rule to create a new rule.
- Configure:
- Priority — the order in which this rule is evaluated.
- Active — whether the rule is in effect.
- Physician IDs — which physicians' orders the rule covers.
- Target user IDs — which users receive matching orders.
- Tap Save. To edit or remove a rule later, tap it from the list and use Edit or Delete.
Note: Physician and user pickers in some rule editor paths may still rely on manual ID entry instead of a searchable list. Have those IDs ready from your team or physician records.
How the claim pool works
The claim pool lets eligible workers pull orders themselves instead of being assigned by a dispatcher.
As a manager, configure the pool from More → Assignments:
- Switch the mode to Auto-zip / Claim Pool.
- Open Claim Pool Settings and set:
- Pause/Resume the pool.
- Cool-off rules — how long after rejection a worker waits.
- Rejection and ignore thresholds.
- Activity window and cool-off duration.
- Save. Eligible workers now see qualifying orders in their Available Orders list.
As a field worker, see Section 10 for how to claim from the pool.
10. Field Worker Workflow
This is the most important section if you work in the field. It walks through a typical day, tap by tap.
Your home screen: My Orders
When you open the app, the My Orders tab shows every order assigned to you. Each card shows:
- Patient name and address.
- Tests to collect.
- The appointment time window (strict appointments have a narrow window).
- Priority — STAT orders are highlighted in red.
Tap any card to open the order detail.
How to start your shift
- Switch to the Shift tab.
- Confirm today's schedule. Shifts are either pre-assigned to you or available to claim from a pool.
- Tap Start Shift when you are ready to work.
When you start a shift:
- LabPilot activates location sharing with your dispatcher so they can route new orders to you and help if something goes wrong.
- The Today's mileage summary and Daily earnings card begin tracking.
- The break timer becomes available.
- If a safe-mode block applies, the screen tells you and prevents conflicting actions.
Tip: If LabPilot detects you have already started working (a route or order is in progress), it can auto-start the shift and shows you a message explaining what happened.
How to take a break
- On the Shift tab, tap the Break timer button.
- The timer starts; the same button stops it when you return.
How to end your shift
- Open the Shift tab.
- Tap End Shift.
- Confirm. Live location sharing stops, today's mileage and earnings are saved, and your shift moves out of "active" state.
How to view your schedule
- Open the Schedule tab.
- The list shows upcoming assignments and schedule context.
- Tap any assignment to open the order.
How to use the map and route
- Open the Map tab to see your assigned route work.
- Tap a stop pin to see the order summary.
- Tap Navigate on an order's detail to launch turn-by-turn directions in your preferred maps app. LabPilot shares your live ETA with dispatch automatically while you drive.
The full collection workflow
A typical order in your queue goes through the steps below. The action buttons appear in the order's Overview tab and change based on the order's current status.
- Review the order. Tap an assigned order to open its detail. Check patient name, address, tests, and any notes.
- Accept the assignment. While the order is in Assigned status, tap Accept Order. If you cannot take it, tap Unable to Accept and choose a reason.
- Start navigation. Once accepted, tap Start Navigation — your preferred maps app opens for turn-by-turn directions and your order status changes to En Route.
- Mark arrived. When you reach the patient, return to the order and tap I Have Arrived. This locks your arrival time into the audit log. (While En Route, you also have Directions to re-open maps and Unable to abort.)
- Start the collection. With the order in Arrived status, tap Start Collection. Use two patient identifiers per your SOP, review the test list, and print specimen labels via the Print Labels action (see Section 12). Perform the draw using standard collection protocols.
- Capture proof and notes. Add any required photos (requisition, label match, patient consent) under the order's Files tab — they upload encrypted. Add notes on the Notes tab.
- If something prevents collection, tap Unable to Collect (available throughout the workflow) and choose a reason. Dispatch is notified instantly.
- Mark collection complete. Tap Collection Complete when specimens are ready for transport. If a patient signature is required, the signature capture screen opens — sign and tap Complete Collection. A "Collection Complete!" confirmation screen appears.
- Hand specimens to the courier or driver. Open the Specimen Handoff screen for the order, confirm the specimen list, and tap Complete Handoff. The order transitions through Picked Up, In Transit, and Delivered.
- Sync. If you worked offline, the sync indicator at the top tells you what is still pending. Connect to a reliable network to push everything up.
How to claim a pool order
When claim-pool is enabled for you, a Mine / Available segmented toggle appears at the top of the orders screen.
- From the orders screen, tap Available in the segmented toggle. The title changes to Available Orders.
- Tap any order card to preview its details.
- Tap Claim to assign it to yourself — it moves into your active Mine list.
- If you decide not to take it, tap Reject and choose a reason. Repeated rejects may apply cool-off rules (configured by your manager).
How to scan a requisition (OCR)
When your role allows OCR scanning, you can create orders on the spot from a paper requisition. See Section 14 for the full step-by-step.
The OCR Scan button (camera icon) lives on the My Orders tab as a floating action button and as a quick action in your Profile tab. If you have pending offline scans, a small counter appears next to the label — for example, OCR Scan (2).
Offline mode and sync status
LabPilot works fully offline. From the Profile tab you can see:
- An offline banner when the network is unavailable.
- A sync status card with pending action count and last sync time.
- A Sync Status action that opens a bottom sheet listing what is queued.
Collections recorded without signal queue locally and sync automatically when you reconnect. The sync indicator in the top bar shows pending uploads — pull down to refresh or tap the indicator to open the queue.
Tip: Photos, completion events, and OCR scans all queue. They upload in order, so the audit log stays consistent.
Profile and stats
From the Profile tab you can:
- View your name, role, and stats.
- Open order history.
- Open your schedule.
- Open mileage history.
- Edit your pool profile.
- Review performance metrics.
- Open the help center.
11. Map, Routes, and Location
How managers use the map
Open the Map tab from the Manager shell to see:
- All active orders on a map.
- Team member locations when their roles allow location sharing.
- Filter and layer controls for status, priority, and team.
- Quick action sheets when you tap a marker (open order, reassign, call patient, message phleb).
- Live updates as field workers move.
How field workers use the map
Open the Map tab from the Field Worker shell to see:
- Your assigned orders for the day.
- Your personal route between stops.
- A Navigate action that launches external turn-by-turn directions.
- Live ETA support to keep dispatch informed.
What location features the app uses
Behind the scenes, location is used for:
- Publish location — periodic updates from field workers to the backend.
- ETA calculation — for both you and dispatch.
- Route optimization — best ordering of your stops.
- Route tracking and history — auditable record of the day's work.
- Team locations — for managers viewing the map.
- Order map data — pins on the manager and field worker maps.
When live location is active
Live location publishing is role-limited and session-limited. It starts only when all of the following are true:
- The company policy allows location sharing for your role.
- There is an active work session (a started shift, an in-progress order, or an active route).
- You have a field role (e.g.
Phleb,HomeDraw,Logistic). - You have granted location consent in your settings.
- Sharing is enabled in your location preferences.
When live location is active you will see a "Live location active during shift." banner near the top of the screen. The banner is your reminder that dispatch can see your position right now.
Location publishing stops when any of these happens:
- You end your shift.
- The active order or route is completed or cancelled.
- You sign out.
- The active work session ends for any other reason (for example, the app is closed for a long time without activity).
How to control your location consent
- Open Settings → Location Settings.
- Toggle Location sharing on or off.
- Review and accept the consent dialog if prompted.
- To stop sharing immediately, end your shift or sign out — both stop publishing.
12. Specimens and Label Printing
Once an order is collected (or further along), you can print and manage its specimen labels. The order must be in a printable state: Collected, Picked Up, In Transit, Delivered, or Completed.
What you can do with specimens
- Retrieve specimens for an order.
- Mark a specimen collected.
- Mark a specimen rejected.
- View chain of custody.
- Print labels.
- Reprint labels.
- Bulk print labels for several orders.
- Choose a printer.
- Configure personal printer settings.
- Configure company-wide default printer settings.
- Track print logs and sync offline print logs.
Label printing uses PDF generation, the OS print dialog, barcode rendering, Bluetooth thermal-printer support, and the backend print-data and print-log routes for auditing.
How to print specimen labels
- Open an order that is in a printable state (Collected, Picked Up, In Transit, Delivered, or Completed).
- On the Overview tab, tap Print Labels.
- If prompted, choose your printer.
- Confirm the print job.
When the job succeeds, the order's print log records who printed which labels and when.
How to reprint
- Open the same order's Overview tab.
- Tap Reprint.
- Choose the printer if prompted and confirm.
How to bulk-print labels
- Open the Orders tab and enter bulk selection mode.
- Select the orders you need labels for.
- Tap Bulk Print Labels.
- Pick the printer and confirm.
How to set up a personal printer
- Open Settings → Printer Settings.
- Choose your printer type (OS print, Bluetooth thermal, etc.).
- If it is Bluetooth, put the printer in pairing mode and tap Pair.
- Test by tapping Print Test Label.
How managers set company printer defaults
- As a manager, open Settings → Company Printer Defaults.
- Pick the default printer type and any default options for your company.
- Tap Save. New users inherit these defaults; they can override them in their own settings.
Offline print logs
If you print while offline, the log queues locally and syncs when you reconnect. The Profile tab's sync card shows any pending print logs.
13. Test Catalog and Test Requirements
The test catalog is the master reference for tests, collection requirements, handling instructions, and the order snapshot you see when collecting.
How to browse the test catalog
- From the Manager shell, open More → Test Catalog. From the Guest shell, open the Tests tab.
- Search or scroll to find a test.
- Tap a test to open Test Detail, which shows code, description, specimen needs, and collection requirements.
- From order detail, the Collection Requirements panel summarizes tubes, handling, and special instructions for that specific order.
How admins import the test catalog
The administrative compendium import lets you load a large set of tests at once.
- Open More → Test Requirements Import (or your admin equivalent).
- Tap Start Import and upload your file.
- The system processes the import and validates staged tests against the schema.
- Review any warnings or errors.
- Tap Activate Import to make the new catalog live.
- Review the Import Status and Audit History to confirm.
You can also sync catalog deltas, snapshot requirements for an order so its requirements stay frozen even if the catalog changes, and read those frozen order requirements later.
Collection requirements on orders
Each order's Overview tab shows its collection requirements so field workers and managers know exactly what tubes are needed, how to handle them, and any special instructions. The catalog drives this.
14. OCR and Document Intake
OCR (optical character recognition) lets you turn paper requisitions into structured orders. There are two entry points: administrative review of uploaded documents, and field scan-to-order.
The OCR screens
- OCR Documents — admin list of uploaded requisitions.
- OCR Review — detail screen for reviewing extracted fields.
- OCR Intake — entry point for uploading new documents.
- Document Scanner — camera UI for capturing a page.
- Manual Crop — refine page edges before extraction.
- Fieldworker Scan — the streamlined scan-to-order flow for phlebotomists.
- OCR upload dialog — for uploading from your file system.
How a phlebotomist scans a requisition
- From the My Orders tab, tap the OCR Scan floating button (or open Profile → OCR Scan). The Scan Document screen opens.
- Tap Start Scan. Point the camera at the requisition page; the scanner detects edges automatically.
- If the auto-crop is off, tap Manual Crop and drag the corners to fit the page.
- Tap Capture. The image uploads and the backend extracts patient, order, and test fields.
- Review the parsed data on the OCR Review screen. Correct any wrong values inline.
- Tap Approve to create or enrich an order, or Reject to discard. If you want to start over, tap Retake.
How an admin reviews uploaded documents
- Open More → OCR Documents (or the admin equivalent).
- Tap a document to open the review screen.
- Approve, reject, or correct fields.
- Approved documents create or enrich an order automatically.
Offline OCR
If you scan while offline, the page is held in the OCR offline queue and uploads when you reconnect. The OCR Scan label shows the pending count, for example OCR Scan (3).
Tip: If OCR keeps misreading a field, fall back to Manual Entry in the order creation wizard (Section 7).
15. Integrations
The Integrations workspace is where you connect LabPilot to external lab information systems, partner labs, and SFTP feeds. Open it from More → Integrations as a manager or admin (when your role includes integration access).
The integrations screens
- Integrations Workspace — the home screen.
- Integrations Dashboard — overall status.
- Add Integration — wizard to start a new connection.
- Integration Detail — per-integration overview, events, and controls.
- Labs — partner lab list.
- SFTP Clients and SFTP Client Detail — manage SFTP feeds.
- Edit Client — change an SFTP client's settings.
- SFTP Imports and SFTP Import Detail — see batches that have arrived.
- HL7 Messages and HL7 Message Detail — monitor and review HL7 traffic.
- Compendium Onboarding Wizard — onboard a new test catalog.
- Partner Client Onboarding Wizard — onboard a new partner client.
Integration types supported
- SFTP for file-based ingestion.
- HL7 ORM (order messages) and HL7 MFN (master-file/catalog updates).
- FHIR R4 with SMART app authentication.
- Direct order ingestion API.
- Quest sync and Labcorp sync.
- Reference lab result webhooks.
- SFTP pre-signed upload for one-off file pushes.
How to manage SFTP clients
- Open Integrations → SFTP Clients.
- Tap Add Client to onboard a new one, or tap an existing client to open detail.
- From the detail screen you can:
- Update connection and credential settings.
- Define field mappings between the client's columns and LabPilot fields.
- Define test code translations between client codes and your catalog.
- Monitor imports and import errors.
- Review client events (a timeline).
- Rotate credentials.
- Download the onboarding packet for the client.
- Replay an import that failed.
- Download an error report.
HL7 routes
The HL7 routes monitor and process:
- MFN messages for master-file and test catalog updates.
- ORM messages for inbound orders.
Use the HL7 Messages list to review traffic and the Detail screen to inspect a specific message.
FHIR
For lab information systems that produce FHIR ServiceRequests, the FHIR endpoints include:
- A capability statement (metadata).
- A SMART configuration endpoint.
- OAuth-style token, register, introspect, and revoke endpoints.
- ServiceRequest create / search / read.
- Bundle ingest for batch submissions.
Ask your admin to configure FHIR endpoints during onboarding.
16. CSV Import
CSV import is the easiest way to bulk-load orders or other reference data.
The CSV screens
- CSV Import — entry screen.
- CSV Import Wizard — the upload, validate, apply flow.
- Import Management — list of past imports.
- Import Validation — detail of a single import's errors and warnings.
How to import a CSV
- From the Dashboard or Orders tab, tap CSV Import (sometimes called Import).
- Upload your CSV file. Drag and drop or tap Choose File.
- LabPilot parses the file and shows a preview with row counts.
- The validation step lists errors (rows that cannot be imported) and warnings (rows that need attention).
- Fix any blocking errors in your spreadsheet and re-upload, or use the in-app row editor where supported.
- Tap Apply to import the valid rows. The job runs in the background.
- Open Import Management to see status, download the report, or view individual rows.
The backend exposes corresponding routes: start, parse, apply, check status, list rows, and download report.
17. Users, Teams, and Invitations
The Team tab in the Manager shell is where you manage the people in your company.
How to view your team
- Open the Team tab.
- The list shows every user in your company with their role and status.
- Tap a user to open User Detail with their profile, role, and documents (where you have permission).
How to invite a user
- From the Team tab, tap Invite User.
- Enter the user's email address.
- Choose the role they should have. Available roles depend on your company type (see "Company roles" below).
- Tap Send Invite.
The backend creates or fetches the Cognito user, assigns them to the role group, creates a profile, and creates a company membership. The user receives an invitation email.
How to bulk-invite
- From the Team tab (or invitation settings), tap Bulk Invite.
- Paste or upload a list of email addresses and roles.
- Review the preview.
- Tap Send.
How to manage invitations
The invitation list shows invitations in their various states.
- Tap Resend to send a fresh invitation email.
- Tap Revoke to cancel an outstanding invitation.
- Invitations that are not accepted in time expire automatically.
How to approve a join request
If your company is configured for self-signup with admin approval, pending requests appear on the Team tab in a dedicated Approvals sub-tab (with a count badge when work is waiting).
- Open the Team tab.
- Switch to the Approvals sub-tab. The badge shows how many requests are pending.
- Tap a request to review the applicant's details.
- Tap Approve to grant access, or Reject with a reason to decline.
Tip: To get notified by email or push when new requests arrive, open Settings → User & Invitation Settings and turn on Notify on Pending Approvals.
How to edit, disable, or revoke a user
From User Detail, the actions available depend on your capabilities:
- Edit changes the user's profile or role.
- Disable suspends their access. Their sessions stop working immediately.
- Revoke Sessions logs them out everywhere without disabling the account.
- View Documents opens any documents they uploaded to their profile.
Company roles
Available roles depend on your company type:
- LAB companies support the broad set of staff roles.
- SERVICE_PROVIDER companies default to HomeDrawManager and HomeDraw, with extended roles when configured.
The backend /companies/{companyId}/roles endpoint returns the role list available for your company.
18. Settings
Settings is available from every shell. What you see depends on your capabilities — capability-gated sections hide automatically when they do not apply to you.
Your profile
At the top of Settings:
- Avatar picker — tap your avatar to upload a new image.
- Name and email — your contact info as the backend has it.
- Active role badge — which role you are signed in as.
- Company switcher — tap to switch between companies you belong to.
To change your avatar: tap the avatar at the top of Settings, choose an image from your camera or gallery, and confirm. The new image uploads and replaces the old one.
To switch companies: tap your avatar (or the company switcher row), then tap the company you want to use. The app reloads with that company's shell, role, and data.
Your preferences
- Notification Preferences — what you get notified about and how.
- Printer Settings — your personal printer (Section 12).
- Appearance — choose Light, Dark, or System theme.
- Location Settings — your location consent and sharing toggle (Section 11).
To change your appearance: tap Settings → Appearance, choose Light, Dark, or System, and the theme updates immediately.
To fine-tune notifications: tap Settings → Notifications. Toggle the categories you care about. See Section 19 for details.
Company settings (managers only)
Visible when your role lets you manage company settings:
- Shift Automation Settings — safe mode, auto-start, exception thresholds.
- Scheduling Settings — patient scheduling defaults.
- Claim Pool Settings — pool configuration (Section 9).
- Company Printer Defaults — default printer for new users.
- User & Invitation Settings — invitation policy and "Notify on Pending Approvals" toggle. (The list of pending requests itself lives on the Team → Approvals tab.)
Integrations
Visible when your role includes integration access:
- Integrations Workspace — manage labs, partner onboarding, and imports (Section 15).
Quick settings
When you have an active company, the Quick Settings card shows toggles for the things you change most often:
- Auto-send Scheduling Requests — on or off.
- The current Scheduling Request Method.
Tap to change without leaving the screen.
Support and legal
The Settings screen also includes:
- How LabPilot Works — the in-app overview.
- Help & Support — open the help center, FAQ, and contact form.
- About LabPilot — version and build info.
- Privacy Policy — the privacy policy.
- Terms of Service — the terms.
- Sign Out — see Section 4.
- Delete Account — see Section 4.
19. Notifications
LabPilot uses notifications to keep you informed of order assignments, status changes, shift events, and system messages.
Where you see notifications
- The Notification Center (bell icon) shows recent in-app notifications.
- The Notifications Screen is a full list with filtering.
- The Notification Settings screen lets you tune what alerts you.
- A connection banner tells you when the real-time WebSocket is offline.
- Physicians see unread result count badges on the Results tab.
What you can do with a notification
- Tap to open the related order, schedule, or system page.
- Tap Read to mark a single item read.
- Tap Read All to mark every visible item read.
- Tap Delete to remove an item from your list.
How to manage notification preferences
- Open Settings → Notifications.
- Toggle the categories you want to receive.
- Choose channels for each category where supported (push, in-app, email).
- Tap Save if your changes are not auto-saved.
Tip: On first launch the app asks for permission to send push notifications. Allow them — LabPilot uses push for time-sensitive events such as new order assignments and shift alerts.
How devices are registered
When you sign in on a device and allow notification permission, LabPilot registers that device automatically for push notifications. Registration happens silently — there is no separate device-management screen in the app.
If you signed in on a new phone and stopped getting pushes on the old one, that is expected. If notifications stop entirely on a working device, sign out and back in once to re-register the device token.
20. Reports, Analytics, Mileage, and Exports
Managers have a set of reporting and analytics tools in More.
Reports
Open More → Reports to see the Reports Hub. From there:
| Report | What it covers |
|---|---|
| Reports Dashboard | Cross-report summary |
| Operations Report | Volumes, turnaround, exceptions |
| Team Performance Report | Per-user productivity and reliability |
| Compliance Report | Audit-ready event trail |
| Daily Summary | One-page summary of today's operations |
| Driver Behavior | Driving and safety metrics |
To open a report:
- Tap More → Reports.
- Tap the report you want.
- Choose the date range and filters (client, lab, service area, etc.).
- Tap Generate or Run.
- Tap Export if you need a CSV — for example, for finance or a compliance audit.
The backend exposes routes for listing available reports, getting a specific report, approving a report, downloading a daily summary, and exporting where your capabilities permit.
Analytics
Analytics screens include:
- Team Performance with period filters.
- Driver Behavior with safety metrics.
Use period filters (today, this week, this month, custom) to narrow the view. Connection and event-driven refresh keep numbers current.
Mileage
Mileage tooling supports field-worker reimbursement and audit.
- Mileage Dashboard — current period summary.
- Mileage History — past entries.
- Mileage Report Detail — detail for a specific period or worker.
Field workers see today's mileage on the Shift tab. Managers can configure mileage settings and view aggregated reports under More → Mileage.
Exports
Exports let you pull data out for analysis or archiving.
To create an export:
- Open the screen you want to export from (Orders, Reports, etc.).
- Tap Export (or Bulk Export in selection mode for orders).
- Choose the columns and format if prompted.
- Confirm. The export runs as a background job.
- When finished, tap Download to pull the file.
21. Sales
Sales is the commercial-only shell. Sales users do not see clinical PHI, the live map, team tracking, or operational settings.
The Sales screens
- Commercial Dashboard — KPIs.
- Accounts and Account Detail / Account Edit — manage commercial accounts.
- Physicians and Physician Detail / Physician Edit — manage physician customers.
- Sales Activities — log of all your commercial activity.
- Log Activity — form to record a new activity.
How sales reps work an account
- Open the Accounts tab.
- Tap an account to open detail.
- Tap Edit to update the record.
- Use Log Activity to record calls, visits, or follow-ups.
How sales reps manage physicians
- Open the Physicians tab.
- Tap a physician to open detail.
- Tap Edit to update the record, or tap the test menu to see what they order most.
How sales reps review history
Open the Activities tab to see your activity history. Tap any row for detail. Use the Commercial Dashboard to see metrics across accounts and physicians.
The backend exposes routes for listing, creating, getting, and updating sales accounts; listing and creating physicians; getting physician-scoped test menus; getting sales metrics; and listing and creating sales activities.
Note: Sales users should not see clinical PHI or operational map/team tools. If you do see those, something is misconfigured — contact your admin.
22. Physician Portal
The Physician shell is for referring physicians who place orders with a lab that uses LabPilot.
The physician screens
- Physician Dashboard — summary.
- Physician Orders — your placed orders.
- Physician Results — result notifications and access.
- Physician Patients and Physician Patient Detail — your patient panel.
- Physician Standing Orders, Standing Order Detail, and Standing Order Create — recurring order templates.
How to place a physician order
- From the Dashboard or Orders tab, tap New Order.
- Select an existing patient or add a new one.
- Pick tests from the physician-scoped catalog. Only the tests your practice is credentialed for appear.
- Specify collection preference (home visit, clinic draw, walk-in) and any clinical notes the phlebotomist should see.
- Choose the preferred lab or provider if more than one is configured.
- Submit. The order is routed to the lab, who will dispatch a phlebotomist or send a scheduling link to the patient.
Physician order creation uses the same three-step enhanced order wizard described in Section 7, in a physician-scoped context.
How to follow an order
- Open the Orders tab.
- The list shows every order you have placed with status, expected completion time, and flags.
- A red banner means attention is needed (patient unreachable, collection failed, sample rejected).
- A green banner means the order is progressing normally.
- Tap an order to open its Timeline and any messages from the lab or phlebotomist.
How to view results
- When the lab posts results, you receive a notification.
- Open the Results tab — the unread badge shows the count.
- Tap a result to open it. Results are HIPAA-compliant and only visible to credentialed providers.
- Tap Download PDF if you need a copy for the patient chart.
How to manage your patient panel
- Open the Patients tab.
- Browse, search, or tap a patient for detail.
- From patient detail you can see their order history and start a new order for them.
How to create a standing order
- Open the Standing Orders tab.
- Tap New Standing Order.
- Configure the recurring tests, schedule, and patient.
- Save. The standing order automatically generates new orders on schedule.
- Tap an existing standing order to view detail or pause / cancel it.
23. Phlebotomist Pool
The phlebotomist pool lets labs discover and vet phlebotomists before formally onboarding them into a company. It is also how independent phlebs maintain a professional profile.
How pool users maintain a profile
- Open the My Profile tab in the Pool-Only shell (or Profile → Pool Profile as a field worker).
- Tap Edit Profile to fill out experience, certifications, and service areas.
- Tap the avatar to upload or change your photo.
- Tap Documents to upload certifications, licenses, and proof of training.
- Open Engagement to see how often labs have viewed or vetted your profile.
- Open Vetted Companies to see which companies have vetted you.
- Pull down to refresh and check whether you have been invited into a company.
How managers browse the pool
Manager pool browsing is available to Admin, PhlebManager, and HomeDrawManager roles.
- Open More → Phlebotomist Pool.
- Use search and filters to find profiles.
- Tap a profile to view detail (experience, documents, service areas).
- Tap Vet to mark the profile as vetted by your company.
- Tap Onboard to invite the phleb into your company. The standard invitation flow runs (Section 17).
- Open Company Relations to see who has vetted whom.
24. Contracts
Contracts manage provider agreements and commercial or operational relationships between companies.
The contracts screens
- Contracts — the list.
- Contract Detail — full view of a single contract.
- Create Contract — wizard.
- Edit Contract — change an existing contract.
How to manage contracts
- As a manager whose role allows contract management, open More → Contracts.
- Tap New Contract to create one. Fill in the partner, terms, pricing, and SLAs.
- Tap an existing contract to view detail. Tap Edit to update or Delete to remove it (where allowed).
The Contracts section is hidden if your role does not allow contract management.
25. Legal and Support
Support
You can reach the Help Center from your shell:
- Help & Support — open the help index.
- User Guide — open the in-app role guide.
- Contact Support — open a support form or pre-filled email.
- FAQ — quick answers to common questions.
- Resource Links — additional documentation links.
The primary support email is support@labpilotapp.com. For app store reviewer contacts, see the relevant App Store / Play Store listing.
Legal
- Privacy Policy is available from Settings.
- Terms of Service is available from Settings.
- Delete Account is documented in Section 4 and accessible from Settings.
26. Offline, Sync, and Resilience
LabPilot is designed to keep working when your network does not.
What works offline
- The connectivity service detects when you go offline and shows a banner.
- The offline action queue captures collections, status transitions, notes, attachments, and other actions for replay.
- The order cache stores your assigned orders for offline viewing.
- The sync service replays queued actions when you reconnect.
- The OCR offline queue holds scanned requisitions until they can upload.
- The print log sync service replays print logs.
- Polling fallback keeps dashboards, orders, and shifts current when WebSockets are unavailable.
- The realtime event bus and notification connection banner show whether realtime delivery is connected.
What to expect as a user
- Some field actions can queue while offline. Mark arrived, collect, and add notes still work.
- Pending actions sync when connectivity returns. Watch the sync indicator at the top of the screen.
- Live features need a network. The live map, team locations, and realtime notifications require connectivity.
Tip: If a single item in the queue keeps failing, tap it in the sync sheet for an error message. Most issues are due to weak signal or an expired session.
27. Security and Compliance
LabPilot uses a layered security model.
How security works
- Cognito JWT authentication secures every API call.
- Backend capabilities drive the UI and protect the data layer.
- Company-scoped membership checks prevent cross-tenant data leaks.
- Backend guard functions verify role and capability on each request.
- PHI access gates block PHI for roles and screens that should not see it.
- Sales restrictions are enforced both in the UI and at the API.
- Audit logs record sensitive actions.
- User and session revocation routes let admins kick a user out instantly.
- Account deletion is available to users and produces a clean removal.
- Location restrictions limit live location to field roles in active work sessions.
What this means for you
- You only see features allowed for your active company and capability set.
- Switching companies can change visible features immediately (Section 18).
- Sales users are intentionally blocked from clinical details.
- Managers and admins may see more team, location, and settings data than field workers.
- Field worker live location is limited to active work sessions plus your consent and sharing settings (Section 11).
28. Troubleshooting
Specific problems and the exact taps to fix them. If these do not help, email support@labpilotapp.com with your company name, the role you are using, and what you were doing when the problem happened.
I cannot sign in
- Verify the email address — sign-in is case-insensitive but typos count.
- Tap Forgot Password? on the sign-in screen. You receive a 6-digit code by email; enter it to set a new password.
- If you see an account-not-confirmed message, check your email (and spam) for the confirmation code and paste it on the confirmation screen.
- Complete any new-password challenge or TOTP prompt if shown.
- If your account is pending approval, disabled, or has no company, contact an admin.
I signed up but I do not see the app
Self-signup can create an identity without company access. Either:
- Contact an organization administrator to invite or approve you, or
- Create a pool profile from the Pool-Only shell if you are in pool-only mode (Section 23).
I do not see a feature
Features are capability-gated. Check:
- Your active company (Settings → company switcher).
- Your role in that company.
- Whether the company is LAB or SERVICE_PROVIDER.
- Whether a manager or admin has enabled the related company setting.
Orders are missing from my list
Possible causes:
- You are signed in to the wrong active company. Switch in Settings.
- You are a Sales user — clinical orders are intentionally hidden.
- You are a field worker with assigned-only filtering applied.
- Active filters or a status tab is hiding them. Clear the filter chips.
- The app is offline. Check your sync indicator.
- The orders belong to a provider or lab whose data you cannot see.
The map is empty
Check:
- Your map capability (only manager and field-worker roles see the map).
- Your network connection — offline mode hides live markers by design.
- The app's location permission in your OS settings.
- Whether you have an active shift or work session (required for live location).
- Whether the order has coordinates entered.
- Whether team location visibility is permitted for your role.
I am not receiving push notifications
- Open Settings → Notifications and make sure the categories you care about are enabled.
- Check device settings.
- iOS: Settings → Notifications → LabPilot.
- Android: Settings → Apps → LabPilot → Notifications.
- Background App Refresh (iOS) and battery optimization (Android) can starve push delivery. Allow LabPilot to run in the background.
- Check device registration in your Settings — sign out and back in once if you switched phones.
- Check the connection banner at the top — if the WebSocket is offline, realtime notifications pause.
- Check whether your role is configured to receive the event type at all.
The printer does not work
Check:
- Personal printer settings (Settings → Printer Settings) — type and pairing.
- Company printer defaults (managers).
- Bluetooth pairing — power-cycle the printer (off for 5 seconds, then on) and re-pair if needed.
- Whether the label type matches your printer.
- Whether the order is in a printable state (Collected, Picked Up, In Transit, Delivered, or Completed).
- The print log sync state if you are offline.
Tip: Only one device can be paired with a Bluetooth printer at a time. Disconnect from other phones or tablets first.
Location is not sharing (phlebotomists)
Dispatch relies on accurate location. If your location is not showing or ETAs are wrong:
- iOS: Settings → LabPilot → Location → While Using the App. Keep LabPilot open during your shift.
- Android: Settings → Apps → LabPilot → Permissions → Location → Allow all the time.
- Make sure Precise Location is on (both platforms).
- Confirm location consent and sharing are on in Settings → Location Settings.
- Confirm you have an active shift — live location is session-limited.
OCR scan fails or misreads
Try:
- Better lighting — OCR struggles in low light.
- Hold the camera 15–20 cm from the document with the full page in frame.
- Use Manual Crop if auto-detection misses the edges.
- Retake the photo.
- Check the OCR offline queue if you are offline.
- Fall back to Manual Entry in the order wizard if OCR is unreliable for this document.
The scheduling link is not working
Possible states:
- Token expired — request a new link.
- Token invalid — confirm the URL is complete and not truncated by the messaging app.
- Slot no longer available — pick another time slot.
- Network or API error — try again in a minute.
- Scheduling not configured — the lab may not have completed scheduling settings; contact the lab.
Upload failures or stuck sync
- Check your sync indicator in the top bar — a red badge means pending uploads.
- Reconnect to a stable network (WiFi preferred over weak cellular).
- Force-close the app and reopen to retry.
- If a specific photo or collection keeps failing, tap it in the sync queue for a detailed error message.
Something crashed or the app froze
- Force-close and reopen the app. Most state is persisted locally, so nothing is lost.
- Check for an app update in the App Store or Play Store — crashes are often fixed in the latest version.
- If it keeps happening, email support@labpilotapp.com with the exact steps to reproduce and the time it happened.
29. Feature Reference
A quick lookup of every user-facing feature, where to find it, and what it does.
| Feature | Where it appears | What it does |
|---|---|---|
| Access states | Auth/entry flow | Routes users to onboarding, pool-only, pending approval, disabled, or full access |
| Accounts | Sales shell | Manage commercial accounts |
| Activity log | Sales Activities | Record sales and commercial activity |
| Admin audit logs | Manager More (Admin) | Review security and system event trail |
| Analytics | Manager More | Team performance and driver behavior metrics |
| App appearance | Settings | Choose light, dark, or system theme |
| Assignment dashboard | Manager More | Configure assignment modes, workloads, claim pool, rules |
| Attachments | Order Detail Files tab | Upload, view, download, delete order files |
| Avatar | Settings / Profile | Upload or show user profile image |
| Bulk actions | Orders | Assign, export, print, or transition selected orders |
| Chain of custody | Specimens | View custody history for specimens |
| Claim pool | Assignment / Field worker | Let eligible workers claim available orders |
| Company switcher | Settings / Auth | Change active company for multi-membership users |
| Contracts | Manager More | Manage provider agreements |
| CSV import | Dashboard / Orders | Bulk import rows and validate/apply them |
| Dashboard | Manager / Sales / Physician | Role-specific summary and KPIs |
| Delete account | Settings | Permanently delete account after confirmations |
| Documents | Profile / Pool / User management | Upload / view user or pool documents |
| Exports | Reports / Orders | Create export jobs and download output |
| FHIR | Integrations backend | SMART/FHIR ServiceRequest and bundle ingestion |
| Field scan | Field worker / OCR | Scan requisition to create or submit order data |
| Guest scheduling | Guest / public /s/{token} | Public appointment scheduling |
| Help center | Settings / More | FAQ, user guide, support contact |
| HL7 messages | Integrations | Monitor HL7 messages and details |
| Integrations | Manager More / Settings | Manage SFTP, HL7, FHIR, lab and client connections |
| Invitations | Team / Settings | Invite, bulk invite, resend, revoke, approve users |
| Label printing | Specimens / Order Detail | Print and reprint specimen labels |
| Live location | Field worker Shift / Map | Share location during active work when allowed |
| Map | Manager / Field worker | View order, team, and route geography |
| Mileage | Field worker Profile / Manager More | Track distance and reimbursement data |
| Notifications | All shells | View, read, delete, configure notifications |
| OCR documents | Manager More / Admin | Review uploaded or scanned requisitions |
| Order creation | Orders / Physician | Create lab or physician-scoped orders |
| Order detail | Orders | View overview, timeline, results, notes, files |
| Order filters | Orders | Search, quick tabs, chips, presets |
| Order results | Order detail / Physician Results | View status, PDF, and results |
| Patient panel | Physician | Manage physician patient list |
| Phlebotomist pool | Pool / Manager | Create, search, vet, and onboard profiles |
| Printer settings | Settings | Manage personal and company label printer config |
| Reports | Manager More | Operations, compliance, daily summary, team performance |
| Route optimization | Map / Field worker | Optimize or view route paths |
| Sales physicians | Sales shell | Manage physician and customer relationships |
| Scheduling settings | Settings | Configure appointment and scheduling behavior |
| Settings | All shells | Profile, company, notifications, printers, legal, support |
| Shift automation | Settings | Configure safe mode and automation |
| Shifts | Field worker / Manager More | Start/end shifts, breaks, active and exception views |
| Specimens | Order detail / printing | Manage collection and rejection states |
| Standing orders | Physician shell | Create and manage recurring physician order templates |
| Sync status | Field worker / offline UI | Show pending offline work and last sync |
| Team | Manager shell | View and manage company users |
| Test catalog | Manager More / Guest / Order creation | Browse test reference data and select tests |
| Test requirements import | Admin | Import, validate, activate compendium data |
| Timeline | Order detail | Audit order events and transitions |
| User guide | Settings / Support | In-app compact role guide |
Last updated: April 2026